In the modern workplace, efficiency and productivity are paramount. Excel is an indispensable tool for data management, but managing extensive worksheets can be cumbersome. Imagine sending an Excel workbook containing numerous sheets to your boss or client, only for them to spend valuable time searching for specific files. This common frustration can be eliminated with a powerful Excel add-in that indexes your workbook, making navigation seamless and saving time.
Streamline Your Workflow with an Indexing Add-In
This innovative add-in for Excel is designed to create an index of all the sheets within a workbook. This simple yet effective tool transforms how you manage and share your Excel files. No longer will your recipients have to sift through countless sheets to find what they need. Instead, they can quickly locate the desired file using the indexed navigation, enhancing their productivity and yours.
Key Benefits of the Indexing Add-In
Enhanced Navigation: The add-in automatically generates an index sheet that lists all the other sheets in your workbook. This index includes clickable links, allowing users to jump directly to the desired sheet with a single click.
Time-Saving Efficiency: By providing a clear overview of all the sheets, this add-in saves significant time for anyone working with complex workbooks. Your boss or client can find the needed information instantly, without the hassle of manual searching.
Professional Presentation: Sending an indexed workbook demonstrates a high level of organization and professionalism. It shows that you value the recipient’s time and have taken steps to facilitate their work process.
How to Use the Indexing Add-In
Implementing this add-in is straightforward. Once installed, simply run the add-in to generate the index sheet. You can customize the index to include specific information, such as sheet descriptions or categories, to further streamline the navigation process. You can Include sheet description in your Indexing automatically by putting the description on the first cell of that respective sheets.
To use the Indexing Add-In you have to follow two simple steps to install it. The First step is to install the Add-In and the Second step is to Create a shortcut somewhere in the ribbon in Excel.
For Installation follow the steps below:
1. First, go to the file menu in Excel and click on Option. As shown in the Picture below:

DOWNLOAD Add-In from this link.
2. Then the Excel options dialog box will open, then select ADD-Ins and click on the GO option at the bottom.

3. Then Add-In dialog box will open and browse your downloaded add-Ins and select it.

4. Select your Add-Ins and Open it.

STEP 2: Create a shortcut somewhere in the ribbon in Excel to easily access the tool
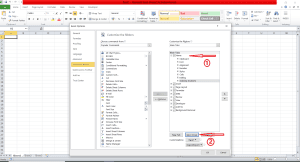
1. Again go to the file menu and select Customize Ribbon, then as shown in the below picture select Home and create New group, and rename the group as your choice.
2. Then change the option ‘Choose command from’ as Macros’ as shown in the below picture, then select the macro and press the ADD button as shown in the below-attached picture.
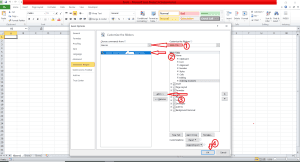
3. Your option will be available in the Excel ribbon section, In this case, the Index option is shown in the picture below.

If you have any issues using this tool please let us know, we will help you as soon as possible.